
References
https://adminscache.wordpress.com/2013/06/09/base64-encoding-of-images/
moutaouakkil/PsLauncher: Run PowerShell scripts without displaying the console window. (github.com)
Overview
Windows Endpoint Notification script to deliver customised information on demand. PowerShell is used as a delivery mechanism and provides functionality to an XAML UI. (XAML is typically used alongside C# or VB, which is commonly known as WPF. Whilst not as powerful as using a programming language, PowerShell can interact with .Net workloads and worked well for this particular use case.)
Background
When tasked with this solution, I wanted to deliver something that was as simple as possible in both it’s implementation, and execution, even if that meant the overall design had to become a little more complicated as a result. So, we have a self-contained PowerShell script which we simply import into MECM’s Run Script feature. We have no dependant files, as our images are converted to ASCII text and bundled into the script (More on that later), our XAML files are generated from text and we have a VB script to launch Powershell without displaying the console window.
- We start by setting up our parameters. These parameters set the Title, Heading, Main Body and Hyperlink sections of the UI. By design, you’ll be prompted for these each time you run the script.
| Param( | |
| [Parameter(Mandatory=$True)] | |
| [string]$Title, | |
| [Parameter(Mandatory=$True)] | |
| [string]$Heading, | |
| [Parameter(Mandatory=$True)] | |
| [string]$MainBody, | |
| [Parameter(Mandatory=$True)] | |
| [string]$Hyperlink, | |
| [Parameter(Mandatory=$True)] | |
| [string]$AlertIcon | |
| ) |
- Next, we define our PSLauncher, XAML and image files. The below is a sample to help you understand it a little better. I’ve removed file content, but we can see we’re simply creating our necessary package files. Doing this can make the script a little lengthy, but it can beat having to pre-stage the content on all clients via group policy or an MECM package.
| #################### | |
| #PSLauncher | |
| #################### | |
| [string]$data=@" | |
| #PSLauncher text here# | |
| "@ | |
| #Copy file to disk | |
| $Data | Set-Content "C:\Program Files\Endpoint_Notification\PSLauncher.vbs" -Force | |
| #################### | |
| #PSLauncher End | |
| #################### | |
| #################### | |
| #Images | |
| #################### | |
| #Logo | |
| #Decode and Set Icons | |
| [string]$data=@" | |
| #ASCII text here# | |
| "@ | |
| #Convert ASCII back to image file | |
| [system.convert]::FromBase64String($Data) | Set-Content "C:\Program Files\Endpoint_Notification\Content\logo.png" -Encoding Byte -Force | |
| #Decode and Set Icons | |
| [string]$data=@" | |
| #ASCII text here# | |
| "@ | |
| #Convert ASCII back to image file | |
| [system.convert]::FromBase64String($Data) | Set-Content "C:\Program Files\Endpoint_Notification\Content\icon.ico" -Encoding Byte -Force | |
| #Alert icons | |
| #Decode and Set Icon | |
| [string]$data=@" | |
| #Information Icon here# | |
| "@ | |
| #Convert ASCII back to image file | |
| [system.convert]::FromBase64String($Data) | Set-Content "C:\Program Files\Endpoint_Notification\Content\information.png" -Encoding Byte -Force | |
| #Decode and Set Icon | |
| [string]$data=@" | |
| "@ | |
| #Convert ASCII back to image file | |
| [system.convert]::FromBase64String($Data) | Set-Content "C:\Program Files\Endpoint_Notification\Content\warning.png" -Encoding Byte -Force | |
| #################### | |
| #Images End | |
| #################### | |
| #################### | |
| #XAML Files | |
| #################### | |
| #MainMenu | |
| [string]$data=@" | |
| #XAML here# | |
| "@ | |
| #Copy file to disk | |
| $Data | Set-Content "C:\Program Files\Endpoint_Notification\Content\MainMenu.xaml" -Force | |
| #Main Window | |
| [string]$data=@" | |
| #XAML here | |
| "@ | |
| #Copy file to disk | |
| $Data | Set-Content "C:\Program Files\Endpoint_Notification\Content\MainWindow.xaml" -Force | |
| #################### | |
| #XAML Files End | |
| #################### |
- Next, we define a PowerShell script which is used to launch the XAML UI. We’re using this script to build the script we’ll end up running on the endpoint, which is why you may notice a lot of back ticks in the code, as we want PowerShell to see this as plain text. The only text we want to view as PowerShell code are the Variables we set using the parameters in the first step. Use a good ISE to help visualise how this works.
| #Create Temporary Notification file to run on the client | |
| New-Item "C:\Program Files\Endpoint_Notification\temp.ps1" -ItemType File -Force -Value " | |
| #Endpoint Notification | |
| #Contact | Josh Woods | |
| #Add Windows Assemblies | |
| Add-Type -AssemblyName PresentationFramework | |
| #Function Examples | |
| #################### | |
| #Create Runspace Example | |
| #################### | |
| <# | |
| #Create RunSpace Example | |
| `$runspace = [runspacefactory]::CreateRunspace() | |
| `$powerShell = [powershell]::Create() | |
| `$powerShell.runspace = `$runspace | |
| `$runspace.Open() | |
| `$runspace.SessionStateProxy.SetVariable(`"syncHash`",`$syncHash) | |
| #Run commands inside seperate runspace example | |
| [void]`$Powershell.AddScript({ | |
| #Update Window Example | |
| `$syncHash.StatusLabel.Dispatcher.Invoke([action]{ | |
| `$Synchash.StatusLabel.Visibility = `"Visible`" | |
| `$Synchash.Progressbar.Visibility = `"Visible`" | |
| }) | |
| #Run Powershell commands here | |
| } ) | |
| `$AsyncObject = `$PowerShell.BeginInvoke() | |
| #> | |
| #################### | |
| #Create Runspace Example End | |
| #################### | |
| ################################################################################################################################### | |
| #Load XAML | |
| ################################################################################################################################### | |
| function Get-XamlObject { | |
| [CmdletBinding()] | |
| param( | |
| [Parameter(Position = 0, | |
| Mandatory = `$true, | |
| ValuefromPipelineByPropertyName = `$true, | |
| ValuefromPipeline = `$true)] | |
| [Alias(`"FullName`")] | |
| [System.String[]]`$Path | |
| ) | |
| BEGIN | |
| { | |
| Set-StrictMode -Version Latest | |
| `$expandedParams = `$null | |
| `$PSBoundParameters.GetEnumerator() | ForEach-Object { `$expandedParams += ' -' + `$_.key + ' '; `$expandedParams += `$_.value } | |
| Write-Verbose `"Starting: `$(`$MyInvocation.MyCommand.Name)`$expandedParams`" | |
| `$output = @{ } | |
| Add-Type -AssemblyName presentationframework, presentationcore | |
| } #BEGIN | |
| PROCESS { | |
| try | |
| { | |
| foreach (`$xamlFile in `$Path) | |
| { | |
| #Change content of Xaml file to be a set of powershell GUI objects | |
| `$inputXML = Get-Content -Path `$xamlFile -ErrorAction Stop | |
| [xml]`$xaml = `$inputXML -replace 'mc:Ignorable=`"d`"', '' -replace `"x:N`", 'N' -replace 'x:Class=`".*?`"', '' -replace 'd:DesignHeight=`"\d*?`"', '' -replace 'd:DesignWidth=`"\d*?`"', '' | |
| `$tempform = [Windows.Markup.XamlReader]::Load((New-Object System.Xml.XmlNodeReader `$xaml -ErrorAction Stop)) | |
| #Grab named objects from tree and put in a flat structure using Xpath | |
| `$namedNodes = `$xaml.SelectNodes(`"//*[@*[contains(translate(name(.),'n','N'),'Name')]]`") | |
| `$namedNodes | ForEach-Object { | |
| `$output.Add(`$_.Name, `$tempform.FindName(`$_.Name)) | |
| } #foreach-object | |
| } #foreach xamlpath | |
| } #try | |
| catch | |
| { | |
| throw `$error[0] | |
| } #catch | |
| } #PROCESS | |
| END | |
| { | |
| Write-Output `$output | |
| Write-Verbose `"Finished: `$(`$MyInvocation.Mycommand)`" | |
| } #END | |
| } | |
| `$path = Join-Path `$PSScriptRoot 'Content' | |
| `$script:syncHash = [hashtable]::Synchronized(@{ }) | |
| `$script:syncHash = Get-ChildItem -Path `$path -Filter *.xaml -file | Where-Object { `$_.Name -ne 'App.xaml' } | Get-XamlObject | |
| # Hide PowerShell Console | |
| Add-Type -Name Window -Namespace Console -MemberDefinition ' | |
| [DllImport(`"Kernel32.dll`")] | |
| public static extern IntPtr GetConsoleWindow(); | |
| [DllImport(`"user32.dll`")] | |
| public static extern bool ShowWindow(IntPtr hWnd, Int32 nCmdShow); | |
| ' | |
| `$consolePtr = [Console.Window]::GetConsoleWindow() | |
| [Console.Window]::ShowWindow(`$consolePtr, 0) | |
| ################################################################################################################################### | |
| #Load XAML End | |
| ################################################################################################################################### | |
| ################################################################################################################################### | |
| #Functions | |
| ################################################################################################################################### | |
| #Default Page | |
| `$script:syncHash.WizardWindowFrame.NavigationService.Navigate(`$script:syncHash.MainMenu1) | Out-Null | |
| #################### | |
| #Set Variables | |
| #################### | |
| `$Synchash.Logo.Source = `"`$PSScriptRoot\Content\logo.png`" | |
| #Window Icon | |
| `$Synchash.Window.Icon = `"`$PSScriptRoot\Content\icon.ico`" | |
| #MECM Run Script Variables – Apply to Window | |
| `$Synchash.Var_Title.content = `"$Title`" | |
| `$Synchash.Var_Heading.text = `"$Heading`" | |
| `$Synchash.Var_MainBody.text = `"$MainBody`" | |
| `$Synchash.Var_Footer.content = `"$Footer`" | |
| `$Synchash.AlertIcon.Source = `"C:\Program Files\Endpoint_Notification\Content\$AlertIcon.png`" | |
| #################### | |
| #Buttons | |
| #################### | |
| #Close Button | |
| `$script:syncHash.CloseButton.add_Click({ | |
| Exit 0 | |
| }) | |
| #Hyperlink Button | |
| `$script:syncHash.Var_Hyperlink.add_Click({ | |
| Start-Process `"$Hyperlink`" | |
| }) | |
| ################################################################################################################################### | |
| #Functions End | |
| ################################################################################################################################### | |
| ################################################################################################################################### | |
| #Display Window | |
| ################################################################################################################################### | |
| `$script:syncHash.Window.ShowDialog() | Out-Null | |
| " |
- Finally, we’re configuring the Scheduled Task. As the Run Scripts feature in MECM uses the system account to execute, we need to find a way around this. I usually incorporate setting up a self-deleting Scheduled Task which runs as the current user, and that’s exactly what we’ll do here too. See the example below.
| #Create Scheduled Task and Run | |
| $PS = New-ScheduledTaskAction -Execute '"wscript"' ` -Argument '"C:\Program Files\Endpoint_Notification\PSLauncher.vbs" "C:\Program Files\Endpoint_Notification\temp.ps1"' | |
| $principal = New-ScheduledTaskPrincipal -GroupId "INTERACTIVE" | |
| $Settings = New-ScheduledTaskSettingsSet -AllowStartIfOnBatteries -DontStopIfGoingOnBatteries -hidden | |
| $Trigger= New-ScheduledTaskTrigger -AtLogon | |
| Register-ScheduledTask -TaskName "Endpoint_Notification" -Trigger $Trigger -Principal $principal -Action $PS -Settings $Settings | Out-Null | |
| Start-ScheduledTask -TaskName "Endpoint_Notification" | Out-Null | |
| Start-Sleep -s 5 | |
| Unregister-ScheduledTask -TaskName "Endpoint_Notification" -Confirm:$false |
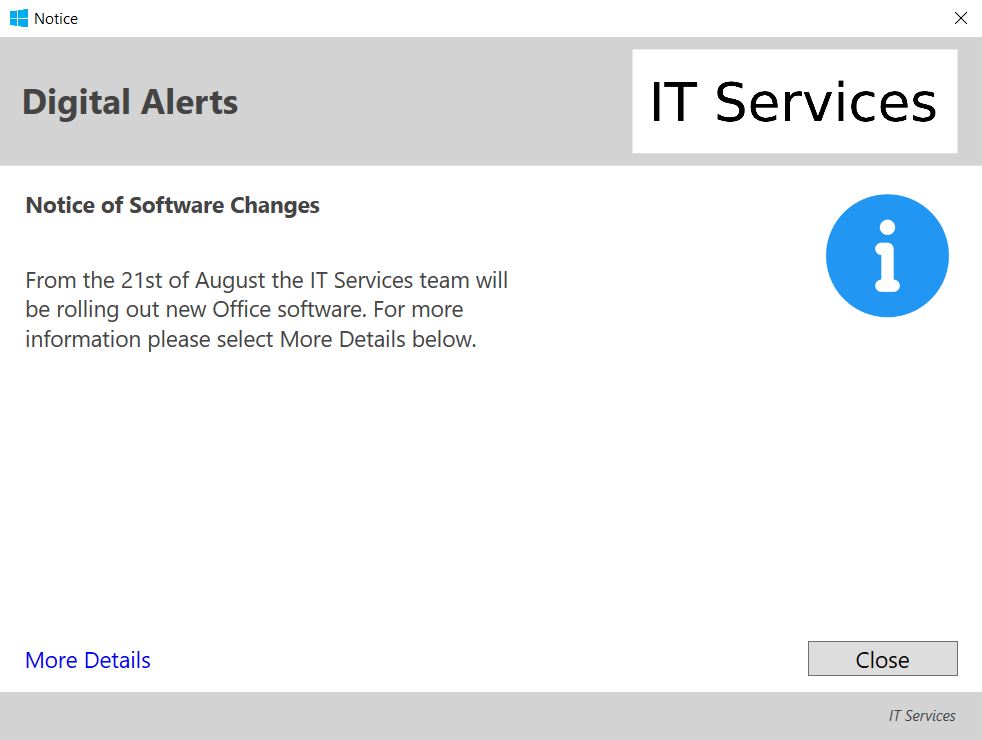
When running the script in MECM, the endpoint will receive the following 800×600 notification on the centre of their screen, with customised fields set according to what you have defined on each run. (More Details is a button for the hyperlink we set)
Based on the example below, the variables I’ve configured to set include:
- Title (Example – Digital Alerts)
- Header (Example – Notice of Software Changes)
- MainBody (Example – From the 21st of August…)
- Hyperlink (Example – More Details)
- AlertIcon (Example – Information Icon) I’ve configured two icons which can be set using the following parameters under $AlertIcon
- information
- warning
How to use
- Import the script into MECM’s Run Script feature.
- Configure the parameters for Title, Heading, MainBody and Hyperlink, then run on clients as needed.
